No matter what industry you’re in, cyberattacks and data breaches are a daily threat. That’s why it’s so vital for DevOps and DevSecOps teams to protect sensitive data and secure access to business-critical resources. As far too many a corporate victim has learned, traditional security methods often aren’t enough. They leave organizations vulnerable to breaches, hinder agility, and place unnecessary burdens on IT teams.
This is where the power of using HashiCorp’s Vault and Boundary in concert with each other emerges, providing a sophisticated security and access management solution that goes beyond cost savings. Together, they enable organizations to greatly improve security, efficiency, and enhance the user experience. However, seamlessly integrating these two powerful tools requires careful planning and consideration. That’s why we’ve pulled together some expert tips to assist with the journey.
When integrating HashiCorp Vault and Boundary, we suggest you keep in mind these crucial aspects to ensure a smooth and successful implementation.

- Understanding the Individual Roles: Understanding the distinct functions of Vault and Boundary is fundamental for effective integration.
- Planning and Design: Defining clear goals, user roles, and access controls is vital for a secure and efficient configuration.
- Authentication and Authorization: Determining the appropriate methods for user authentication and authorization ensures secure access to resources.
- Secrets Management: Establishing robust secret lifecycle management practices is crucial for protecting sensitive information.
- Session Management: Configuring secure session management settings is essential for controlling access duration and privileges.
- Monitoring and Auditing: Implementing comprehensive monitoring and auditing capabilities aids in maintaining visibility and responding to potential threats.
- Best Practices and Tips: Exploring additional recommendations for optimizing the integration and ensuring long-term success.
1. Understanding the Individual Roles

Vault: Provides organizations with identity-based security to automatically authenticate and authorize access to secrets and other sensitive data. It offers a centralized platform for storing, managing, and accessing secrets like passwords, API keys, and certificates. Vault enforces access control through granular policies, ensuring users only have the specific permissions they need for their tasks.
Boundary: Think of Boundary as a vigilant gatekeeper, meticulously controlling access to resources based on pre-defined policies and user identities. It acts as a session management layer, facilitating secure connections between users and target resources like databases, applications, and servers. Boundary leverages Vault for dynamic credential generation and access control enforcement, ensuring users only possess the necessary credentials for the duration of their session. Built for cloud-native environments, modern privileged access management from HashiCorp Boundary uses identity-driven controls to secure user access across dynamic environments.
By understanding these distinct roles, we can begin to visualize how these two tools can work together to create a secure and efficient access management solution.
2. Planning and Design
Before starting the integration journey, planning and design is key. Here are key aspects to consider:

- Define Clear Goals: Identify your specific security objectives for tailoring the integration. Is your primary focus on minimizing the attack surface, simplifying compliance, or streamlining access control workflows?
- Identify User Roles and Access Needs: Clearly define different user roles within your organization and the specific access permissions they require to perform their tasks. This will form the foundation for creating granular Vault policies and Boundary access controls.
- Network Segmentation: Evaluate your network architecture and consider implementing segmentation strategies to further isolate critical resources and restrict access.
3. Authentication and Authorization
With a clear understanding of user roles and access needs, you can configure secure authentication and authorization mechanisms. Key elements to consider:

- Authentication Methods: Choose appropriate authentication methods for users, such as LDAP or Active Directory integration, multi-factor authentication (MFA), or certificate-based authentication.
- Vault Authentication: Configure Vault to authenticate users based on the chosen method and integrate it with your existing authentication infrastructure.
- Authorization with Vault Policies: Define granular Vault policies that specify which users and groups have access to specific secrets and the permissions they possess (read, write, etc.).
- Boundary Access Control: Leverage Vault’s policies within Boundary to enforce access control at the session level. Users will only have access to designated resources based on their Vault permissions and the duration of their granted session.
4. Secrets Management
Securely managing secrets is critical for protecting sensitive information and preventing unauthorized access. Key considerations for integrating Vault and Boundary:

- Secret Storage Options: Vault offers various secret management solutions, including key-value pairs, credential stores, and integrations with popular cloud platforms and third-party tools. Choose the appropriate integration type based on your specific secrets and their use cases.
- Secret Lifecycle Management: Establish robust practices for managing the lifecycle of secrets, including generation, rotation, and revocation. Automate these processes whenever possible to minimize manual errors and ensure timely updates.
- Dynamic Credentials: Leverage Vault’s dynamic credential generation capabilities to create short-lived, unique credentials for each user session. This significantly reduces the risk associated with static credentials, further enhancing security.
- Boundary Credential Injection: Configure Boundary to securely inject dynamically generated credentials into user sessions, eliminating the need for users to manage them directly.
5. Session Management
Controlling user sessions is crucial for maintaining a secure environment. When integrating Vault and Boundary, keep these things in mind:

- Session Timeouts: Configure session timeouts in Boundary to automatically terminate user sessions after a predetermined period of inactivity. This minimizes the potential damage if a user’s session is compromised.
- Idle Timeouts: Implement additional idle timeouts within the session that automatically lock or terminate the session after a period of inactivity, further enhancing security.
- Session Recording (Optional): Consider enabling session recording in Boundary for audit purposes. This can provide valuable insights into user activity and facilitate incident investigations.
6. Monitoring and Auditing
Implementing comprehensive monitoring and auditing capabilities is essential for maintaining visibility into user activity and identifying potential threats. When Boundary and Vault work together, these things are to be considered:

- Monitor Vault and Boundary Logs: Monitor logs generated by both Vault and Boundary to identify suspicious activity, failed login attempts, and access control violations.
- Centralized Logging: Consider integrating Vault and Boundary logs with a centralized logging platform for streamlined analysis and visualization.
- Alerting: Configure alerts to be triggered based on specific events within Vault and Boundary logs, notifying security teams of potential security incidents.
7. Best Practices and Tips

When integrating Vault and Boundary there are many elements that need to be considered and prioritized for the journey. HashiCorp Terraform can be used for efficient configuration management and infrastructure deployment. Consider configuring Vault and Boundary for high availability to ensure resilience and minimize downtime.
To get the most out of your investment with custom tips and strategy, reach out to RPT. We provide a tailored 360-degree approach that addresses your specific environment and requirements. Once our team of experts meticulously analyzes all pertinent information and carefully considers every relevant aspect, we are ready to craft exciting and innovative solutions tailored to your unique needs and circumstances.
Summary
By following these essential considerations and best practices you can successfully integrate HashiCorp Vault and Boundary to better protect your organization against external and internal threats. The result can be a more secure and efficient access management ecosystem that empowers your organization to thrive in the ever-changing digital landscape. Remember, security is a continuous journey, not a destination. As technology evolves, so do the techniques used by hackers and cybercriminals. That’s why it’s imperative for DevOps and DevSecOps teams to regularly review and update their organization’s security practices to stay ahead of the threat landscape.
For more tips on how to maximize your investment in Vault and Boundary, read this.
Need help maximizing the benefits of using Vault & Boundary? Contact the experts at RPT. As HashiCorp’s 2023 Global Competency of the Year and the only HashiCorp partner with all 3 certifications (Security, Infrastructure, & Networking), you know you’re working the leading HashiCorp services partner. Contact info@riverpointtechnology.com today.
About River Point Technology
River Point Technology (RPT) is an award-winning cloud and DevOps service provider that helps Fortune 500 companies accelerate digital transformation and redefine what is possible. Our passionate team of engineers and architects simplify the deployment, integration, and management of emerging technology by delivering state-of-the-art custom solutions. We further position organizations to experience Day 2 success at scale and realize the value of their technology investments by offering best-in-class enablement opportunities. These include the subscription-based RPT Resident Accelerator program that’s designed to help enterprises manage the day-to-day operations of an advanced tech stack, the just-launched RPT Connect App, and our expert-led training classes. Founded in 2011, our unique approach to evaluating and adopting emerging technology is based on our proprietary and proven Value Creation Technology process that empowers IT teams to boldly take strategic risks that result in measurable business impact. What’s your vision? Contact River Point Technology today and see what’s possible.
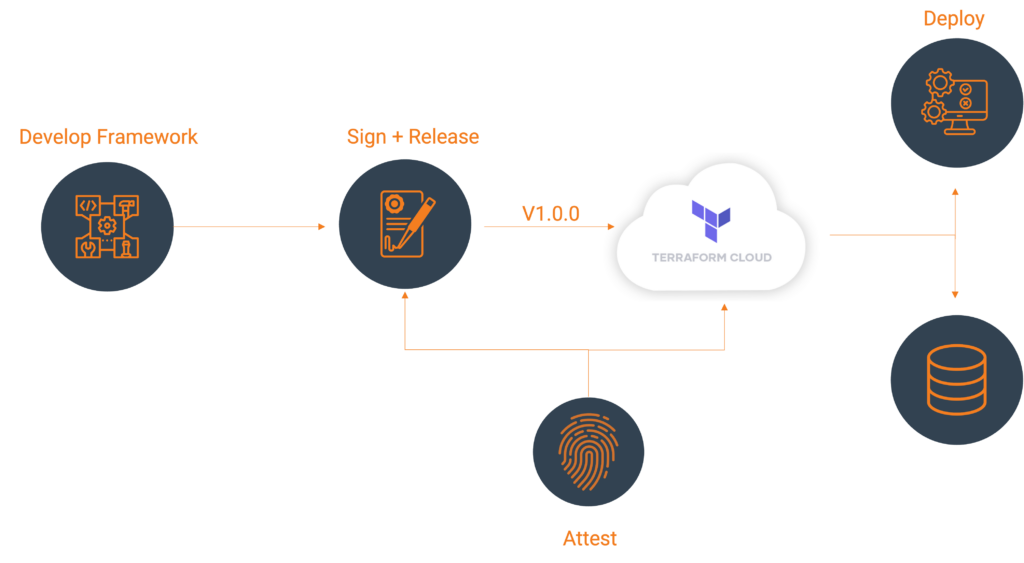
HashiCorp’s Terraform Cloud provides a centralized platform for managing infrastructure as code. It’s a leading provider in remote Terraform management with remote state management, automated VCS integrations, and cost visibility. One of its features, a private registry, can be used to develop internal Terraform providers where control, security, and customizations are paramount.
Let’s explore an example using the Terraform Provider Scaffolding Framework to build a custom Terraform provider and publish it to a private registry. Scaffold provides a framework starter kit that you can use out of the box to replace your APIs.
Signing Your Provider
Code signing guarantees that the generated artifacts originate from your source, allowing users to verify this authenticity by comparing the produced signature with your publicly available signing key. It will require you to generate a key pair through the GNU PGP utility. You can develop this by using the command below, be sure to replace GPG_PASSWORD and your name with values that make sense.
gpg --default-new-key-algo rsa4096 --batch --passphrase "${GPG_PASSWORD}" --quick-gen-key 'Your Name <name@example.com>' default defaultExport Public Key
With your newly generated key securely stored, the next step involves exporting and uploading it to Terraform Cloud. This action facilitates verification while deploying your signed artifacts, and ensuring their authenticity within the platform’s environment. The GPG Key API requires the public key to validate the signature. To access the list of key IDs, you can execute: gpg --list-secret-keys --keyid-format LONG. The key is denoted in the output.
[keyboxd]
---------
sec   rsa4096/<KEY ID> 2023-11-22 [SC] [expires: 2026-11-21]
You can then get your public key as a single string. KEY=$(gpg --armor --export ${KEY_ID} | awk '{printf "%sn", $0}'). You’ll then need to build a payload with the output of that file and POST that to https://app.terraform.io/api/registry/private/v2/gpg-keys. The ORG_NAME is your Terraform cloud organization.
{
  "data": {
        "type": "gpg-keys",
        "attributes": {
            "namespace": "${ORG_NAME}",
            "ascii-armor": "${KEY}"
        }
    }
}
Export Private Key for CI/CD (Optional)
If you plan to use this key in a CI Platform, you can also export the key and upload it gpg --export-secret-keys --armor ${KEY_ID} > /tmp/gpg.pgp to a secure Vault.
Packaging Terraform Providers with GoReleaser
GoReleaser simplifies the process of building and releasing Go binaries. Using GoReleaser, we can bundle different architectures, operating systems, etc.
You will need to create a terraform registry manifest, the protocol version is essential. If you are using Plugin Framework, you will want version 6.0. If you are using Plugin SDKv2, you will want version 5.0.
{
    "version": 1,
    "metadata": {
      "protocol_versions": ["6.0"]
    }
}
Configuring GoReleaser
Ensure your goreleaser.yml configuration includes settings for multi-architecture support and signing. This file should live at the provider’s root, next to your main codebase.
before:
  hooks:
    - go mod tidy
builds:
- env:
    - CGO_ENABLED=0
  mod_timestamp: '{{ .CommitTimestamp }}'
  flags:
    - -trimpath
  ldflags:
    - '-s -w -X main.version={{ .Version }} -X main.commit={{ .Commit }}'
  goos:
    - freebsd
    - windows
    - linux
    - darwin
  goarch:
    - amd64
    - '386'
    - arm
    - arm64
  ignore:
    - goos: darwin
      goarch: '386'
  binary: '{{ .ProjectName }}_v{{ .Version }}'
archives:
- format: zip
  name_template: '{{ .ProjectName }}_{{ .Version }}_{{ .Os }}_{{ .Arch }}'
checksum:
  extra_files:
    - glob: 'terraform-registry-manifest.json'
      name_template: '{{ .ProjectName }}_{{ .Version }}_manifest.json'
  name_template: '{{ .ProjectName }}_{{ .Version }}_SHA256SUMS'
  algorithm: sha256
signs:
  - artifacts: checksum
    args:
      - "--batch"
      - "--local-user"
      - "{{ .Env.GPG_FINGERPRINT }}"
      - "--output"
      - "${signature}"
      - "--detach-sign"
      - "${artifact}"
    stdin: '{{ .Env.GPG_PASSWORD }}'
release:
  extra_files:
    - glob: 'terraform-registry-manifest.json'
      name_template: '{{ .ProjectName }}_{{ .Version }}_manifest.json'
changelog:
  skip: true
Tag your Branch
git tag 0.0.1
git checkout 0.0.1
Your git strategy may differ, but GoReleaser uses branch tags to determine versions.
Bundle and Sign Binaries
Execute GoReleaser to bundle the binaries locally without publishing. We skipped publishing as we will manually upload them to Terraform Cloud.
export GPG_TTY=$(tty)
export GPG_FINGERPRINT=${KEY_ID}
goreleaser release --skip=publish
Now we have our artifacts.
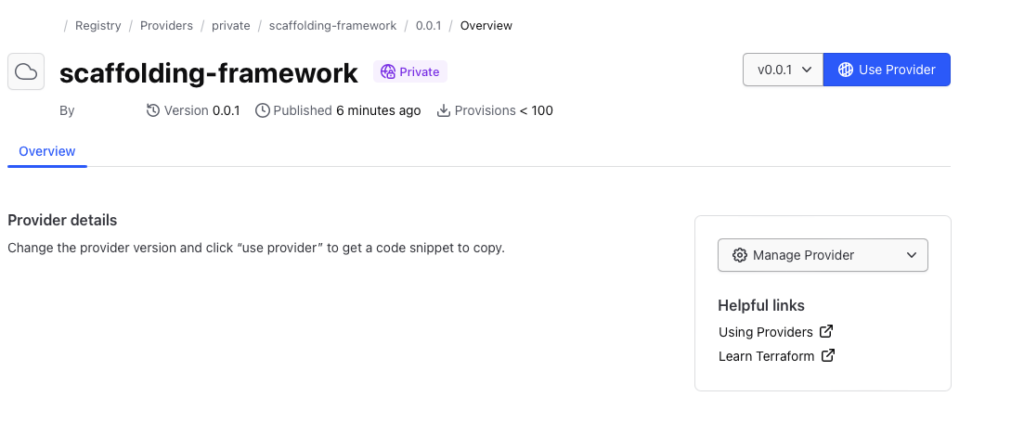
Publishing to Terraform Cloud Private Registry
Once you have the signed binaries, you can publish them to the Terraform Cloud private registry. HashiCorp provides a guide, which we will follow.
Register the provider (first time only)
Create a provider config file and POST that body utilizing your Terraform Cloud API token. A provider name is usually a singular descriptor representing a business unit, such as Google or AWS.
curl --header "Authorization: Bearer ${TERRAFORM_CLOUD_API_TOKEN}"
--header "Content-Type: application/vnd.api+json"
--request POST
-d @-
"https://app.terraform.io/api/v2/organizations/${ORG_NAME}/registry-providers" <<EOT

{
  "data": {
    "type": "registry-providers",
    "attributes": {
      "name": "${PROVIDER_NAME}",
      "namespace": "${ORG_NAME}",
      "registry-name": "private"
    }
  }
}
EOT
Uploading your Versions
Create Version Shell within Private Registry Providers
curl -H "Authorization: Bearer ${TOKEN}"
  -H "Content-Type: application/vnd.api+json"
 --request POST
  -d @-
"https://app.terraform.io/api/v2/organizations/${ORG_NAME}/registry-providers/private/${ORG_NAME}/${PROVIDER_NAME}/versions" <<EOT

{
  "data": {
    "type": "registry-provider-versions",
    "attributes": {
      "version": "${VERSION}",
      "key-id": "${KEY_ID}",
      "protocols": ["6.0"]
    }
  }
}
EOT
The response will contain upload links that you will use to upload the SHA256SUMS and SHA256.sig files.
"links": {
    "shasums-upload": "https://archivist.terraform.io/v1/object/dmF1b64hd73ghd63",
    "shasums-sig-upload": "https://archivist.terraform.io/v1/object/dmF1b37dj37dh33d"
 }
Upload Signatures.
# Replace ${VERSION} and ${PROVIDER_NAME} with actual values
curl -sS -T "dist/terraform-provider-${PROVIDER_NAME}_${VERSION}_SHA256SUMS" "${SHASUM_UPLOAD}"
curl -sS -T "dist/terraform-provider-${PROVIDER_NAME}_${VERSION}_SHA256SUMS.sig" "${SHASUM_SIG_UPLOAD}"
Register Platform for every Architecture and Operating System.
FILENAME="terraform-provider-${PROVIDER_NAME}_${VERSION}_${OS}_${ARCH}.zip"
SHA=$(shasum -a 256 "dist/${FILENAME}" | awk '{print $1}' )
# OS ex. darwin/linux/windows# ARCH ex. arm/amd64# FILENAME. terraform-provider-<PROVIDER_NAME>_<VERSION>_<OS>_<ARCH>.zip. Define through name_template

curl -H "Authorization: Bearer ${TOKEN}"
 -H "Content-Type: application/vnd.api+json"
 --request POST
 -d @-
  "https://app.terraform.io/api/v2/organizations/${ORG_NAME}/registry-providers/private/${ORG_NAME}/${PROVIDER_NAME}/versions/${VERSION}/platforms" << EOT
  {
    "data": {
        "type": "registry-provider-version-platforms",
        "attributes": {
            "shasum": "${SHA}",
            "os": "${OS}",
            "arch": "${ARCH}",
            "filename": "${FILENAME}"
        }
    }
}
EOT
The response will contain upload the provider binary to:
"links": {
  "provider-binary-upload": "https://archivist.terraform.io/v1/object/dmF1b45c367djh45nj78"
}
Upload archived binaries
curl -sS -T "dist/${FILENAME}" "${PROVIDER_BINARY_URL}"Repeat step: Register Platform for every Architecture and Operating System and step: Upload Archived Binaries for every architecture and operating system.
Using the provider
Private providers hosted within Terraform Cloud are only available to users within the organization.
When developing locally, ensure you set up credentials through the terraform login, creating a credentials.tfrc.json file.
With the authentication bits setup, you can utilize the new provider by defining the provider block substituting in those existing variables.
terraform {
  required_providers {
    ${PROVIDER_NAME} = {
      source = "app.terraform.io/${ORG_NAME}/${PROVIDER_NAME}"
      version = "${VERSION}"
    }
  }
}

provider "${PROVIDER_NAME}" {
  # Configuration options
}
Document Provider
For user consumption, a common practice is to provide provider documentation for your resources utilizing Terraform plugin docs. This plugin generator allows you to generate markdowns from examples and schema definitions, which users can then consume. At the time of publication, this feature is currently not supported within the Terraform Cloud. Please talk to your River Point Technology representative for alternative solutions.
Cleanup
To remove the provider from the registry:
Delete version
curl -H "Authorization: Bearer ${TOKEN}"
 --request DELETE
  "https://app.terraform.io/api/v2/organizations/${ORG_NAME}/registry-providers/private/${ORG_NAME}/${PROVIDER_NAME}/versions/${VERSION}"
Delete provider
curl -H "Authorization: Bearer ${TOKEN}"
 --request DELETE
  "https://app.terraform.io/api/v2/organizations/${ORG_NAME}/registry-providers/private/${ORG_NAME}/${PROVIDER_NAME}"
Deregister GPG Key
curl -H "Authorization: Bearer ${TOKEN}"
 --request DELETE
https://app.terraform.io/api/registry/private/v2/gpg-keys/${ORG_NAME}/${KEY_ID}
Conclusion
With a private registry, you get all the benefits of Terraform while still allowing internal consumption. This may be desirable when public providers don’t meet your use case and it comes with a host of benefits:
- More Customization and Control: A private registry allows organizations to maintain control over their proprietary or custom-built Terraform providers. It enables them to manage, version, and distribute these providers securely within the organization.
- Better Security and Compliance: A private registry ensures that only authorized users within the organization can access and utilize specific Terraform providers for sensitive or proprietary infrastructure configurations. This control aids in compliance with internal policies and regulatory requirements.
- Improved Versioning and Stability: With a private registry, teams can maintain a stable versioning system for their Terraform providers. This helps ensure project infrastructure configurations remain consistent and compatible with the specified provider versions.
Publishing custom Terraform providers to the Terraform Cloud private registry involves bundling, signing, and uploading binaries and metadata through the API. Following these steps, you can effectively manage and distribute your Terraform provider to support various architectures and operating systems.
River Point Technology (RPT) is here to guide you through the intricacies of exploring the dynamic cloud landscape. If you’re facing challenges and need assistance in achieving increased customization and oversight, enhanced security and compliance, along with improved versioning and stability, feel free to leave a comment or reach out to us directly.
As the HashiCorp Global Competency Partner of the Year and the only company certified in all three competencies—Security, Networking, and Infrastructure—we stand out as a market leader. Trusted by Fortune 500 companies, we serve as their guide in effectively navigating the dynamic cloud terrain. Contact RPT for guidance in optimizing the journey through the cloud landscape.